Surface Metrology

- Surface Metrology
-
Technology
White-Light Interferometry
Modern white-light interferometers use the interference effects that occur when the light reflected from the sample is superimposed with the light reflected by a high-precision reference mirror.
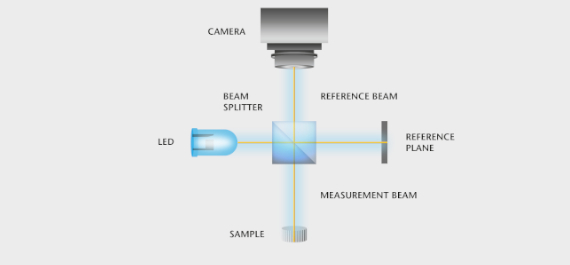
The measurement method is based on the principle of Michelson interferometry, where the optical configuration (image) contains a light source with a coherence length in the μm range. The collimated light beam is split into a measurement beam and a reference beam at a beam splitter. The measurement beam strikes the sample, the reference beam strikes a mirror. Light reflected from the mirror and the sample is recombined at the beam splitter and focused onto a camera.
Whenever the optical path for an object point in the measuring arm and the optical path in the reference arm are the same, constructive interference takes place for all wavelengths in the light source’s spectrum and the camera pixel of the object point in question has maximum intensity. For object points with a different optical path, the assigned camera pixel has a low intensity. Consequently, the camera registers all the image points at the same height.
Large area systems with a telecentric configuration allow you to simultaneously and quickly measure the topography of large surfaces in a single measurement. On the other hand optical profilers based on microscope systems, where the optical configuration including the reference arm is integrated into the lens, are more suitable if you require more lateral details on the whole area.

Chromatic Confocal Technology
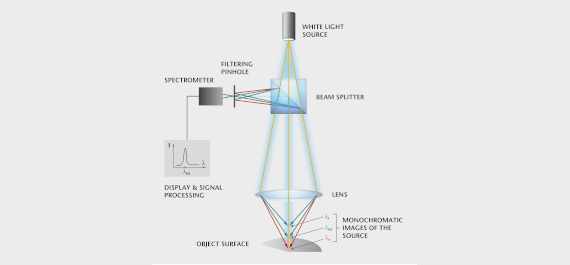
Chromatic confocal technology for optical measurement of distance and thickness has been established as one of the mature methods available to industry and research. The optical TopSens sensors are based on this measurement principle. Incident white light is imaged through a chromatic lens to yield a continuum of monochromatic light along the z-axis, thereby “colour coding” the optical axis. When an object is present in this colour field, a single wavelength is fixed to its surface and then reflected back to the optical system. The backscattered beam passes through a filtering pinhole and is then acquired by a spectrometer. The beam’s specific wavelength is calculated to precisely determine the position of the surface in the measurement field. Chromatic confocal technology allows reliable, accurate and reproducible dimensional measurements with high resolution.

Flatness is often decisively important for functional surfaces, with examples including components with sealing surfaces used in pressure and vacuum technology, as well as transparent films for displays, semiconductor elements, metal surfaces and ceramic surfaces. Determining percentage contact areas is a simple and reliable process too. In this context, the TopMap systems allow you to measure large surface areas of up to 37 x 28 mm2 and thus get fast, complete characterization of the workpiece.
EXAMPLE: FLATNESS OF MIRROR HOLDERS
The mirror holders for the scanning vibrometer’s geometry scan unit are manufactured on a turning/milling centre in Polytec’s mechanical production shop. Stresses induced during machining can impair the flatness of the resulting surface. The deviations are examined using a TopMap white-light interferometer and are optimized accordingly in the production process.
Polytec is a world leader in technology for optical topographic measurement of large areas with nanometer precision. Determining parallelism, flatness, radii, steps, angles and other parameters are typical tasks for this technology. The areas to be examined are often situated in subjacent holes or differ a great deal in terms of height. But this is an easy task for Polytec’s systems in contrast to other optical measuring methods, such as coherent interferometry.
ACQUIRING THE TOPOGRAPHY
In many cases, the complete topography of a workpiece or object has to be checked, as is the case, for example, with the shock absorber component shown here or with other precision workpieces in the automotive industry, in aerospace development or in precision mechanics.
Ceramic components, imprints, safety features and even forensic evidence can be analyzed with nanometer accuracy using white-light interferometry. Also, the demands placed on the warping and deformation of components such as printed circuit boards are forever growing as dimensions continue to shrink.


Surface Parameters
Very often, mechanical designs for workpieces include specifications for defined parameters such as roughness or ripple. White-light interferometers can acquire 3D profiles that require a very long measuring time if acquired using tactile processes within a few seconds, particularly for flat parameters. Such parameters – take the percentage contact area or frequency distributions, for example – can be determined quickly and easily. Roughness can be optically determined too, but the values can deviate from the results of tactile measurements to which the drawing dimensions and standards often refer. However, new guidelines for calibrating white-light interferometers give the user the assurance that the measured values can be traced back to calibration standards. Optical measurements also make roughness parameters available. Often, for instance, it is sufficient to decide whether the surface of e.g. dynamic sealing surfaces is too rough – which would lead to high friction losses – or too smooth, which could result in excessive adhesion.

A large vertical adjustment range is often the key to determining parallelism, height differences or angles between several surfaces. The TopMap series offers adjustment ranges of up to 70 mm, or 50 mm that can be used to measure surfaces that are separated from one another by large steps or are situated inside holes. The TopMap systems’ telecentric light beam path avoids shadowing effects.

TopMap surface measurement systems can be easily integrated in the production line. By testing workpieces at an early stage of the production cycle and identifying trends in good time, production costs can very often be reduced. Polytec’s white-light interferometers are suited to use in a metrology chamber, located near the production line or installed directly in-line. The TMS-300 TopMap In.Line is the ideal production control system for precisely measuring surfaces as they are manufactured. The compact device can be used in various mounting configurations in the production line and measures preset specifications (flatness, topography) within short cycle times and with complete coverage.
Determining the amount of material removed plays a key role when it comes to wear measurements. In this situation, the surfaces are often very jagged and the light reflected back shows great intensity differences. The SmartSurface scanning technology incorporated into the TopMap systems guarantees optimum results in such cases too.
Wear and tear studies are also traditional tasks for topography measurements. Examples of such tasks include performing a root cause analysis when brake disks have suffered wear and tear.
In industrial production, compliance with specified tolerances has to be checked as often as possible. This helps to ensure that defective parts are eliminated before any further processing steps are taken and that unnecessary costs are avoided. White-light interferometers can be used to quickly examine large areas of many surfaces for the number of defects, form deviations, ejections, missing connections or break-offs. Processes can be permanently or randomly monitored too. In many cases, the complete topography of a workpiece or object has to be checked, as is the case, for example, with the shock absorber component shown here.
SAMPLE APPLICATIONS
Flatness deviations were determined on the annular section of a piezo system component. The results are reflected in the profile section shown.
When assembling SMD printed circuit boards, for example, all of the solder bumps should be the same height and the surfaces of structural elements must be at a certain angle to one other.
NC machines often have to be properly adjusted to ensure that parts are manufactured to the required flatness and curvature values. Checking workpieces at an early stage during machine set-up helps to save both time and money. During this process, the relevant parameters are checked before production is started and the processing machines’ settings are optimized. Machine operation can also be monitored with ease.
EXAMPLE: CNC-MACHINED COMPONENT
The images show a processed workpiece with two surfaces stacked horizontally. The small surface, which has been lowered by approximately 3 mm, is measured to see how parallel it is to the upper surface and how flat it is.
Basic Priciples Scanning White-Light Interferometry
Contact us!
Your PolyXpert in Surface Metrology